Showing posts with label crafts. Show all posts

Monday, October 7, 2013

DIY Wedding Decor

DIY weddings require a lot of work, both in planning out and creating so many decor elements, and executing the day of, but it's so worth every glue gun burn! I loved being able to hand craft every detail of our big day to ensure it embodied who we are as individuals and as a couple. Here's a sampling! 

I had several really beautiful paper banners made by one of my bridesmaids!
This one, featuring our wedding date, hung on the front of our entry table.
Menu painted on vintage framed window. Table assignments clipped to a large bird cage themed wall hang.
Center pieces: wood slice, white wine bottle sans label, hand made chalkboard and twine necker. Wedding arrow painted on vintage framed window. Autographed wood slice instead of traditional guest book. Sweetheart table decorated with bird cages, an "I Do, Me Too" paper banner, and our initials. 
Tables decorated with burlap runners. Mason jar glasses with paper straws.
DIY burlap pillows with "Mr" and "Mrs" painted in white.
These were placed on a Victorian couch in the cigar and port lounge. 
Vintage wooden frame turned into a wine cork board with burlap and lace runner and flower.
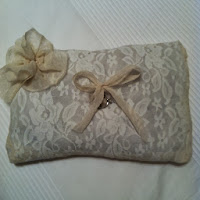
Handmade ring pillow for bride's ring. 
Wood box painted white with silk flower attached to the top for groom's ring. 
Wine charm favors doubling as place markers at table settings
Hand painted wooden cake toppers
Beanbag toss hand made by my dad for the lawn games featured at our cocktail hour.

Wednesday, October 2, 2013

Wedding Vendors

Wedding planning is hard; harder than you think it's going to be; harder than it sounds when people tell you about it. Even with an extreme level of organization, it's simply not possible to get through the entire process without any frustrations or unexpected setbacks. My best piece of advice is to find vendors who you connect with, who you're comfortable with, and who are easy to communicate with. Let your vendors know up front what level of interaction you need from them so the expectations are set right from the beginning. 

I absolutely have to brag on our wedding vendors because each and every one of them completely blew me away with their quality of work and day-of execution.

VENUE
Young's Vineyard
   - When we were shopping around Shenandoah Valley for a winery venue, Young's Vineyard became our clear choice from the moment we set foot on the property. The vineyard owner, Annette, is friendly and easy to work with and can almost always be found in the tasting room alongside her employees. We highly recommend their port, zinfandel and chardonnay! 

CATERING & RENTALS
Clark's Corner Ione
   - Clark's Corner's event coordinator, Jessica, is the most personable and enthusiastic caterer I've ever worked with. Jessica was open to developing a menu that met our taste and style rather than pushing us into any already developed packages. The entire staff seemed genuinely excited to be a part of our wedding and never gave off an "I'm just here to work" vibe. Jessica also orchestrated all of our table, chair, place setting, and linen rentals through Party Smart. Clark's Corner wasn't just a vendor, they were a part of our wedding!

MUSIC
DJ Maestro
   - Abel had a website where our guests could request reception songs ahead of time. There were no hidden fees for sound equipment, as his base package includes his table, two speaker stands and a lapel mic for the officiant. Abel was good about sticking to our day-of timeline and was flexible when necessary. Abel has seamless transitions, good volume control and uses the clean edits of songs.

POPCORN STATION AT COCKTAIL HOUR
   - Popcorn Wagon has a wide selection of drool-worthy flavors! The website has a guide that helps customers determine the appropriate volume to order. It was easy to schedule our delivery. The popcorn arrived on time and tasted fresh. Their prices are extremely reasonable for the quality of product!

OFFICIANT
Galen Dalrymple
   - Galen has known me since I was five years old, and he and his wife have remained some of my parents' dearest friends all my life. It was important to Scott and I that we have someone officiate our wedding who was and would continue to be invested in our lives and marriage. Galen provided pre-marital counseling during our engagement but was never intrusive. He was open to conducting the ceremony in a way that Scott and I were comfortable with. I couldn't have been more pleased! 

PAPER SIGNS AND BANNERS
My incredibly talented bridesmaid Erin Yamashita-Urevig (soon to be on Etsy!)
   - Erin isn't available to you just yet, but I'll be sure to let you know as soon as she is! Erin's creativity and quality of work never ceases to amaze me! Her banners were the perfect finishing touch on our decor, and tied our theme together in such a Pinterest-worthy way!


Wednesday, September 18, 2013

DIY Cake Toppers

And the countdown continues - our wedding is in 10 days! Eek! I am flying to California Friday, so I've already been packing and organizing and finishing up as much crafting as possible before heading out. 

One of my favorites from our many DIY projects is our cake toppers! 

Initially, we hadn't planned on cake toppers because we aren't having a cake. A wedding without a cake - I know, right? But neither of us really like cake and we didn't see the point in spending a bunch of money on something we didn't care about. Instead, we are having a dessert station with assorted cheesecake bites! Although I didn't mind skipping the cake, I didn't really want to skip the cake cutting moment, so our caterer offered to prepare a sweethearts cheesecake just for us. At that point it only made sense to have (cheese)cake toppers, but they would have to fit our casual, country chic theme.

I stumbled across an Etsy shop called Goose Grease, which is a Columbian fair trade DIY wood figures business owned and operated by a family in Brooklyn. "Fair trade"often equals outrageous prices, but I really feel like I got an excellent bargain with their wedding kit, which only cost me $28.95! The box included four toppers, two brides and two grooms, which relieved my "oh no, what if I mess up!" anxiety. The six colors provided were adequate, since I was able to mix them to get the shades I needed for our wedding colors. The kit even included two paint brushes and a cute fabric pouch.


Tuesday, May 28, 2013

Wine Cork Board

When the beau and I booked our wedding venue, the owner was gracious enough to give us a massive bag of unused wine corks! For months I tossed around wine cork craft ideas, trying to decide how to incorporate them into our wedding. A couple of weeks ago, we were driving home from brunch when out the window I spotted an old, wooden frame at a neighbor's garage sale. I knew just what to do with it!

First, I detached one side of the wire hang on the back of the frame just to get it out of the way. Then, I attached a trimmed down piece of poster board, gently hammering in small nails every few inches all the way around the back of the frame. I glued the wine corks in rows to fill the frame. It's near impossible to find a frame that will fit the exact measurements of your corks, so either cut down corks to finish off your rows or, the much easier option, find a way to cover the gap. I used burlap and lace to create a runner around the end where the corks didn't fill the frame and topped it off with a bow in the corner.

I'm not sure exactly how I'll implement the cork board into my wedding decor just yet, but I'm absolutely in love with it!


Friday, January 6, 2012

Bedside Lamp

I have a small bedside stand that I've been looking to put a lamp on for ages but haven't been able to find anything well suited. Lamps are so boring and lamp shades take up too much space. I recently saw some lighting fixtures in an Urban Outfitters store and thought to try it out for myself. 

For years I've owned a cord for hanging a single bulb, I assume intended for paper lamps and such, but hadn't found use for it. I decided to cut the wire frame out of a lampshade I already owned and turn it into a mini version of the fixtures I'd seen at Urban. 

I started out with scissors but switched to a razor blade because it was easier to maneuver. I cut off the fabric, tossed the bottom of the frame and only used the smaller top piece, attached the bulb and frame to the cord, and ta-da! Perfect bedside lighting that I can switch on and off from bed instead of having to walk over to the switch.